How To Screen Print for Beginners
Brema・16 minutes read
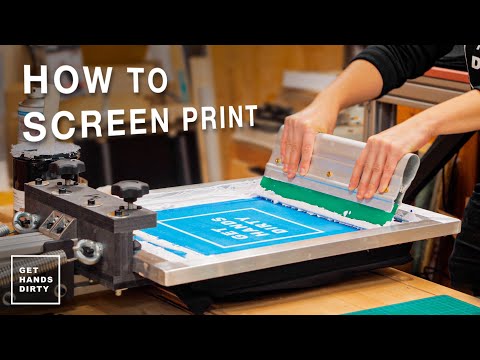
The video tutorial covers cost-effective screen printing methods for beginners, highlighting the importance of basic supplies and proper techniques such as mixing photo emulsion, coating the screen, creating a design, and washing off the emulsion post-exposure. It concludes with guidance on the printing process using fabric screen printing ink, emphasizing the need to clean the screen after each run for future use.
Insights
- Beginners in screen printing need basic supplies like a 160 mesh screen, photo emulsion, sensitizer, and a squeegee to start the process effectively.
- Proper maintenance of the screen, including cleaning after each run, washing off ink residue, and drying it thoroughly, is crucial for its longevity and reusability in future screen printing projects.
Get key ideas from YouTube videos. It’s free
Recent questions
How can I start screen printing at home?
To start screen printing at home, you will need basic supplies like a 160 mesh screen, photo emulsion, sensitizer, and a squeegee. Begin by mixing the photo emulsion and sensitizer thoroughly before applying it to the screen. Coat the screen with the emulsion using a custom-made tool or a store-bought one, ensuring even coating and removing bubbles. Let the screen dry overnight in a dark room. Create a design on a transparency by hand or through a print shop. Use a DIY light setup or a professional light box for the burning process. Align and tape the transparency to the screen before exposing it for a set time. Wash off the emulsion after exposure and dry the screen flat with a fan. Finally, print using fabric screen printing ink, flood the screen, and cure the print through air drying.
What supplies do I need for screen printing?
For screen printing, you will need basic supplies such as a 160 mesh screen, photo emulsion, sensitizer, and a squeegee. These supplies are essential for creating the screen with the desired design and transferring it onto various surfaces. The 160 mesh screen allows for detailed designs to be transferred accurately, while the photo emulsion and sensitizer work together to create the stencil for printing. The squeegee is used to push the ink through the screen onto the material being printed. Having these supplies on hand will ensure a smooth and successful screen printing process.
How do I create a design for screen printing?
To create a design for screen printing, you can either draw it by hand on a transparency or have it printed at a print shop. The design should be clear, detailed, and suitable for the screen printing process. Ensure that the design is the desired size and orientation for the project you are working on. Once the design is ready, align and tape it securely to the screen before proceeding with the exposure process. Creating a design is a crucial step in screen printing as it determines the final outcome of the printed material.
What is the importance of washing the screen after printing?
Washing the screen after each run of screen printing is crucial for maintaining the screen for future use. This process helps remove any ink residue left on the screen, preventing it from drying and clogging the mesh. By washing off the ink, you ensure that the screen remains clean and ready for the next printing job. After washing, let the screen dry completely before storing it properly. With regular cleaning and care, the screen can be reused multiple times, saving you time and money in the long run.
How do I cure the print in screen printing?
To cure the print in screen printing, use fabric screen printing ink and flood the screen with the ink. Once the design is transferred onto the material, allow the print to air dry completely. Curing the print ensures that the ink sets properly and adheres to the material, creating a long-lasting and durable print. Avoid touching the print until it is fully cured to prevent smudging or smearing. By following the proper curing process, you can achieve professional-looking results in your screen printing projects.
Related videos
GET HANDS DIRTY
Print Your Own Posters, T-Shirts and More // Screen Printing Basics

Mikey Designs & Silk Screen
STEP BY STEP How to Screen Print Simulated Spot Process Full Tutorial - Anatol Titan Automatic Press

Eddie Moon
Screen Print Your Own T-Shirt: Step by Step Tutorial

Brema
How To Screen Print For Your Streetwear Brand

Stahls' TV™
How to Start a T-Shirt Business at Home | Key Things to Know!


Summary
00:00
"Beginner's Guide to Cost-Effective Screen Printing"
- The video tutorial focuses on cost-effective screen printing methods for beginners.
- Emphasizes the need for basic supplies like a 160 mesh screen, photo emulsion, sensitizer, and a squeegee.
- Explains the process of mixing photo emulsion and sensitizer thoroughly before applying it to the screen.
- Demonstrates the coating of the screen with the emulsion using a custom-made tool or a store-bought one.
- Advises on ensuring even coating and removing bubbles before letting the screen dry overnight in a dark room.
- Details the creation of a design on a transparency either by hand or through a print shop.
- Shows the burning process using a DIY light setup or a professional light box for exposing the screen.
- Guides on correctly aligning and taping the transparency to the screen before exposing it for a set time.
- Instructs on washing off the emulsion after exposure and drying the screen flat with a fan.
- Concludes with the printing process using fabric screen printing ink, flooding the screen, and curing the print through air drying.
21:59
Screen printing maintenance for reusability and longevity.
- Clean the screen after each run of screen printing to remove ink residue, wash it off, let it dry, and it can be reused multiple times with proper care. This process is essential for maintaining the screen for future use in screen printing.


